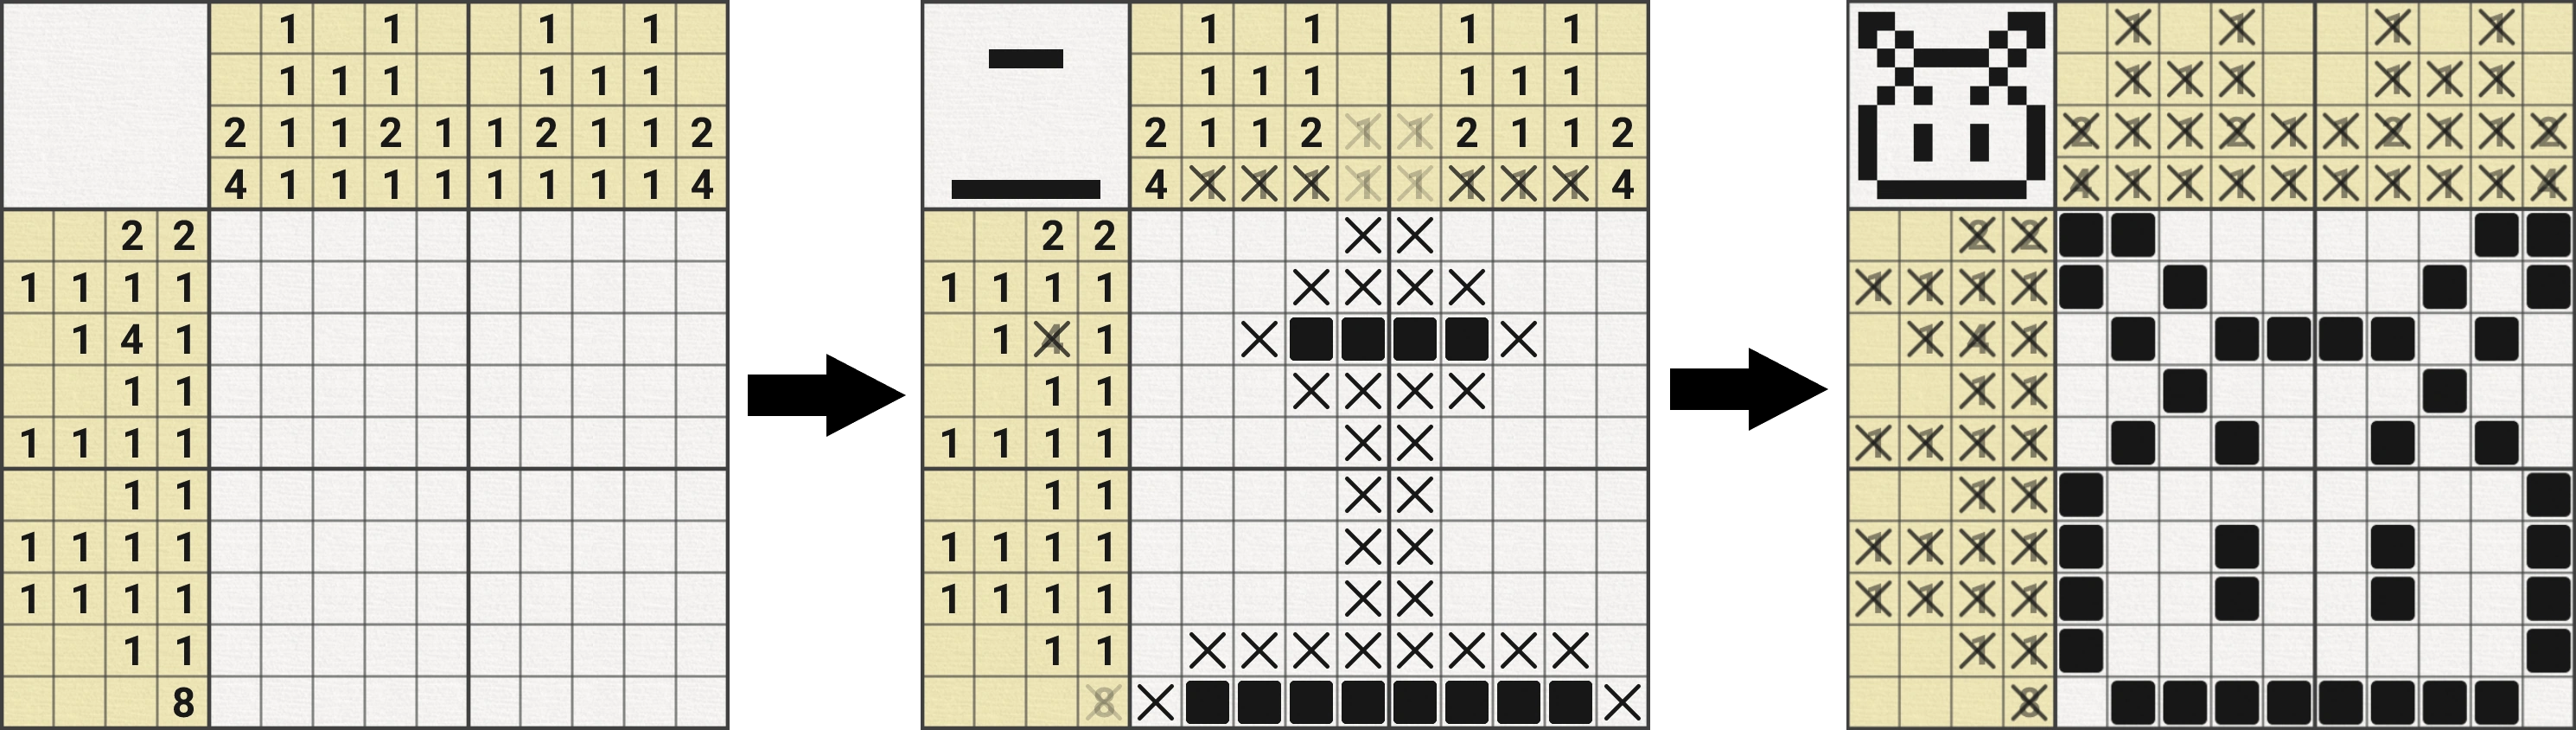
This page describes how to solve nonograms using simple and advanced techniques. There are also some tools specific to Nonograms Katana, which significantly help the user to faster and easier solve nonograms.
Sound of completing a puzzle.
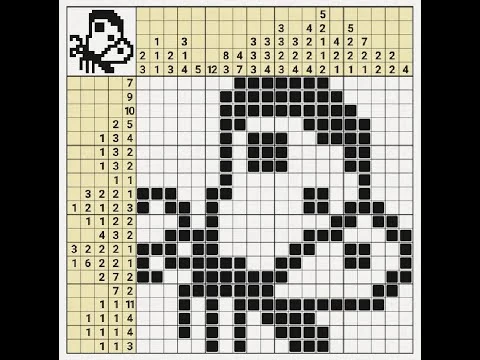
Black-and-White Nonograms[]
Basic rules[]
- Numbers on the side (later clues, sometimes called number bars) represent how many squares you need to color (i.e. colored squares, later boxes) in that line.
- Between those boxes there must be at least one empty space (later cross).
Techniques[]
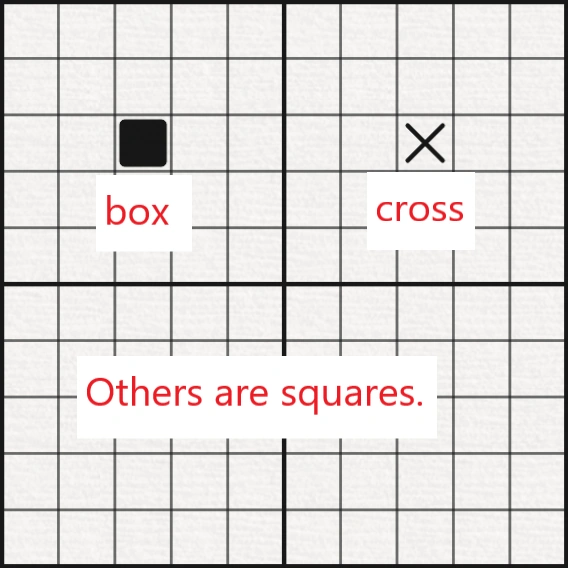
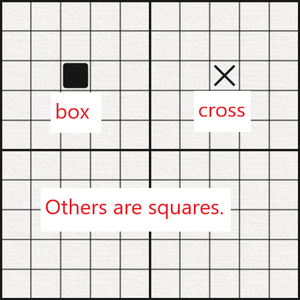
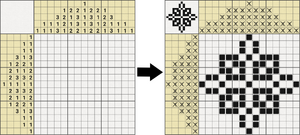
Explanation of terms: box, cross and square.
These techniques are explained on a 10x10 grid. A "square" (sometimes also called a "cell") is an empty space on the grid, which isn't marked yet. A "box" is a square colored black. A "cross" is a square which 100% isn't colored.
All techniques are considered as basic techniques, except for contradictions.
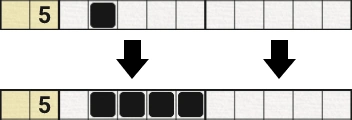
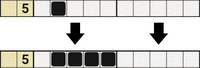
Simple boxes
")
")
")
This technique is used beside the border and beside crosses. This technique is also used to fill trivial lines. You put boxes where there's no other option to put them elsewhere. Example 1: You have a clue of 10. You fill that line. Example 2: You have a clue of 3-4 and a box on the 1st square. That box has to be a 3. So you put 2 more boxes on the 2nd and 3rd square. Example 3: You have a clue of 2 and 8 crosses in that row. There's only one option you can put the 2 in.
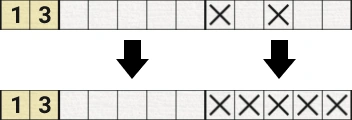
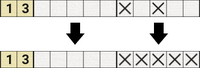
Simple crosses

Example 4. Simple crosses.
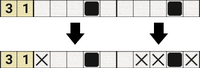
You put crosses where the boxes cannot possibly be. Example 4: You have a clue of 3-1 and 2 boxes on the 4th and 9th square. Then you know that the right box is going to be 1 and the left box is going to be a part of 3. You put crosses on the right and left side of the right box. Then you look where the 3 can go and put crosses where it can't. So you put crosses on the 1st, 7th, 8th and 10th square.
Overlapping
")
")
If the sum of clues and spaces in between clues in a line (you can measure it with the "ruler tool") plus the largest number is greater than the line, you can use this technique. It's recommended to use this when you start a puzzle. Example 5: You have a clue of 8. There are only 3 options this 8 can be positioned. Where they overlap, there's a box. If you've noticed, you can only put the 8 on the left and on the right side and see where they overlap. Example 6: Be careful, if you have a clue of 4-3, that you don't put boxes where the 3 and 4 overlap. Only put boxes where the same numbers overlap.

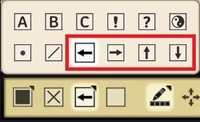
Either one out of four arrows can be chosen as a mark. The game will automatically select the correct arrow when you start dragging.
Math for example 5: clues(8) + spaces between clues(0) + largest clue(8) = 16 > line(10). That means that every clue in this line which is larger that 6 (16 minus 10) can be overlapped. The 6 also represents how many squares you can color for the largest clue. The number 2 (line(10) - clues(8) + spaces between clues(0)) represents how many squares you need to mark empty for each clue.
Math for example 6: clues(4+ 3) + spaces between clues(1) + largest clue(4) = 12 > line(10). That means that every clue in this line which is larger that 2 (12 minus 10) can be overlapped. The 2 also represents how many squares you can color for the largest clue. The other 2 (line(10) - clues(4+3) - spaces between clues(1) = 2) represents how many squares you need to mark empty for each clue.
Note: The "ruler tool" measures the combined number of clues and spaces in between clues (this number is 4+3+1=8 in example 6). To draw arrows like in the examples above, you can choose either one out of four arrows in the User interface > mark > arrow - up, down, left or right (see image). When you tap in drag in one direction the game will automatically select you the right arrow (e.g., if you tap and drag to left, it will select the left arrow and the left arrow will be drawn).
Spreading
Example 7. Spreading.
This technique is used when you have one or more boxes near the border or a cross. Then you can "spread" that box away from the border or cross depending on how big the clue is. Example 7: You have a clue of 5 and a box on the 2nd square. You can put boxes on the 3rd, 4th and 5th square, because the 5 can only go on one square to the left.
Forcing
Example 8. Forcing.
When you already have some crosses in the line, you can try to fit (force) the clues in the line. Example 8: You have a clue of 1-3 and two crosses on the 6th and 8th square. The 3 cannot fit in the right corner, because of the cross on the 8th square and it cannot fit in between the 6th and the 8th square either. So you put crosses on the 7th, 9th and 10th square.
Joining and splitting
")
")
Self-explanatory. Example 9: You have a clue of 5 and 2 boxes on the 2nd and 4th square. Both boxes have to be parts of 5, so you put a box on the 3rd square. Example 10: You have a clue of 2-2 and two boxes on the 4th and 6th square. If you try to put a box on the 5th square, you get 3 boxes in a row, which wouldn't be correct. So the only solution is to put two boxes on the 3rd and 7th square.
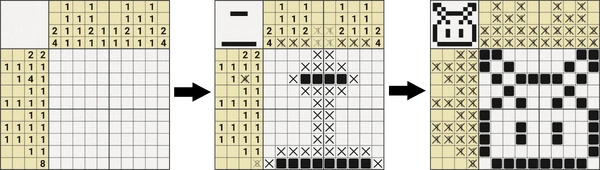
Contradictions
Sometimes it happens that none of the above techniques will help you further. This is more of a guessing technique, so it's better to check every row and column before you start using this, to avoid any mistakes. Here is probably the time when you would use weapons, but if you don't want, this technique will help you. It's probably a good idea to check for correctness and lock the puzzle, because if you find out that the box you put in is wrong you can just discard changes.
You try to put one box ("guess" box) in and try to solve as much as you can with techniques above. Also remember where you have put the box. When you come across a contradiction, you know that the box you first put in (the "guess" box), is suppose to be a cross. If you don't come across any contradictions, that doesn't necessarily mean that it's correct, so it's better to guess boxes that have only 2 options (if there is space for 6 boxes and you have a clue of 5 for example), which means a 1 in 2 chance to be correct. A special case of this technique is edge solving. This is done on the last row or column of the puzzle. Example: A clue of 4 on the last row. You try to put this 4 in the right side and try to solve with the techniques above. If you come across a contradiction you put a cross in right corner and only there. Then you move one square to the left and do the same thing. You can also go from left to right. If you are lucky enough, you can "guess" where this 4 is. And sometimes you just get some crosses in the corners of the puzzles that might help you in some other way. This technique is more useful if there is a clue of 5 or more on the edge and there is another large number beside it.
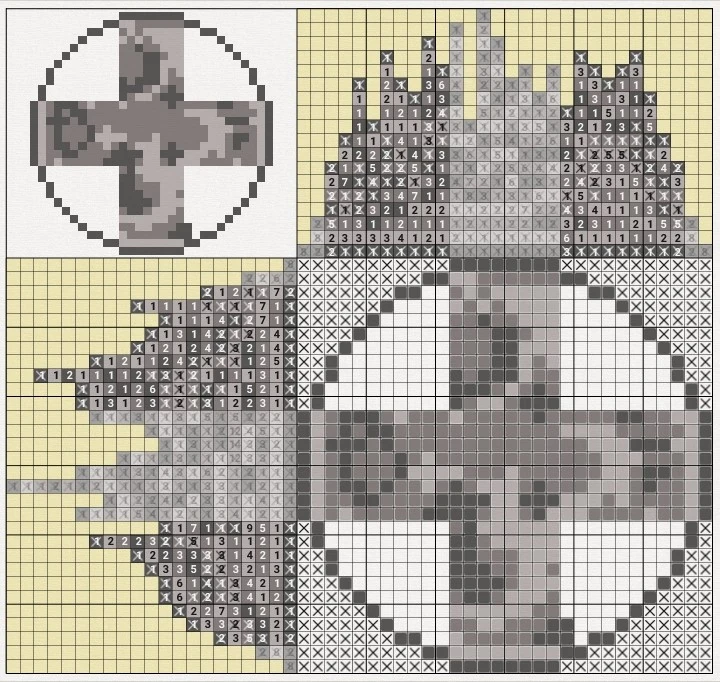
Colored Nonograms[]
Colored Rules[]
- The numbers on the side (later clues) represent the order and length in which that line is colored.
- If the clue contains a color twice in a row there must be an empty space (later cross) between them.
They are usually easier to solve than black-and-white nonograms. Same techniques apply as for black-and-white nonograms. You can imagen them as multiple nonograms layered onto one each other.
Tools[]
Tools can really improve your solving experience and help you solve nonograms faster and easier. Below are listed some tips/ideas where to use each tool and how. For an explanation of the tools see UI > Tools.
![]() Straight line: especially helpful when coloring long straight sections.
Straight line: especially helpful when coloring long straight sections.
![]() Arbitrary line: useful for coloring cells, which are easily guessed.
Arbitrary line: useful for coloring cells, which are easily guessed.
![]() Rectangle: useful for coloring large rectangles.
Rectangle: useful for coloring large rectangles.
![]() Paint bucket: very useful for coloring large (irregularly shaped) sections of a nonogram, which you already know the outline of (the outline has to be colored first with a different tool). Be careful, you have to fully close the outline, or the tool will color some unwanted cells.
Paint bucket: very useful for coloring large (irregularly shaped) sections of a nonogram, which you already know the outline of (the outline has to be colored first with a different tool). Be careful, you have to fully close the outline, or the tool will color some unwanted cells.
![]() Color picker: it's useful sometimes? (Does anyone use this tool?)
Color picker: it's useful sometimes? (Does anyone use this tool?)
![]() Ruler: very useful for measuring the distance of empty cells when doing the overlapping technique or when measuring the already colored cells - boxes. You don't have to drag, you can just tap and hold and it will measure the height and width of the cells horizontal and vertical of the selected cell.
Ruler: very useful for measuring the distance of empty cells when doing the overlapping technique or when measuring the already colored cells - boxes. You don't have to drag, you can just tap and hold and it will measure the height and width of the cells horizontal and vertical of the selected cell.
Tips (colored and black-and-white)[]
- Look for full lines. You can enable "suggest to fill trivial lines at start" and this will do it for you. Enabling this is not recommended for progressing quicker through the Adventurers Guild, since it reduces rewards. However, after checking out where these trivial lines are, you can restart the puzzle and receive rewards as usual.
- Try to solve one color first (colored nonogram only).
- Look for symmetry.
- Look for overlaps.
- Look for simple boxes and crosses.
- Start on the borders of the puzzle and move inwards.
Focus on one color
When there's a low amount of clues of a single color try to solve that color first.

Focus on the border
Look at the last clues of the last or the first row and then try to match it with that column.
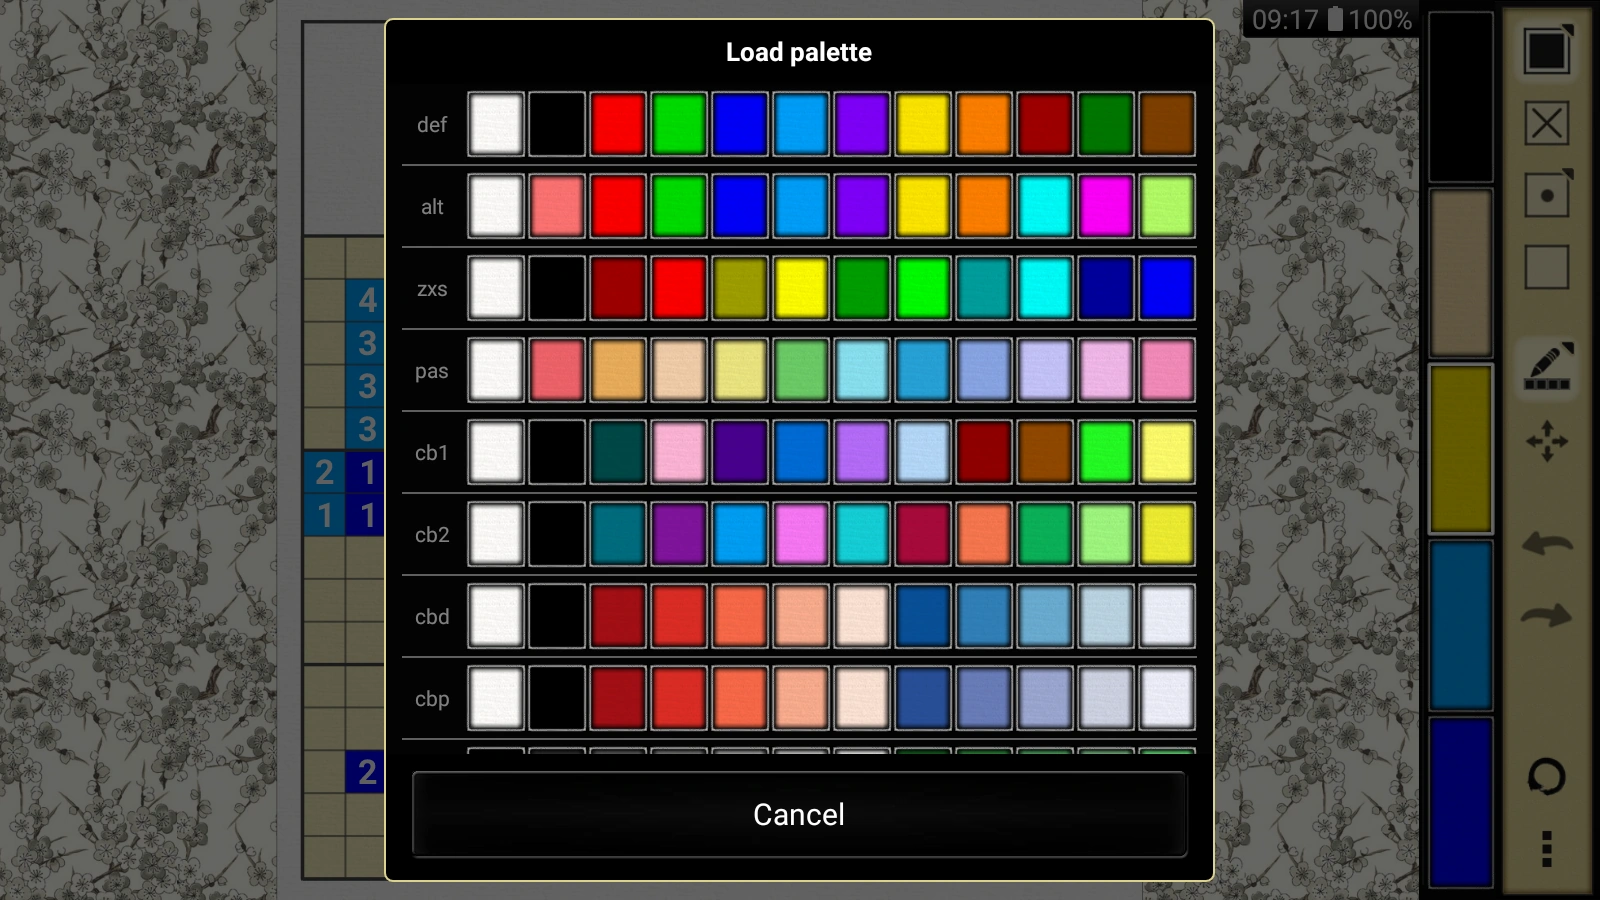
Use the default palette
Sometimes it can be hard to tell colors apart, because they looks so alike. Double tap on any color and load the default color palette as this palette has colors which can be easily differentiated between each other.
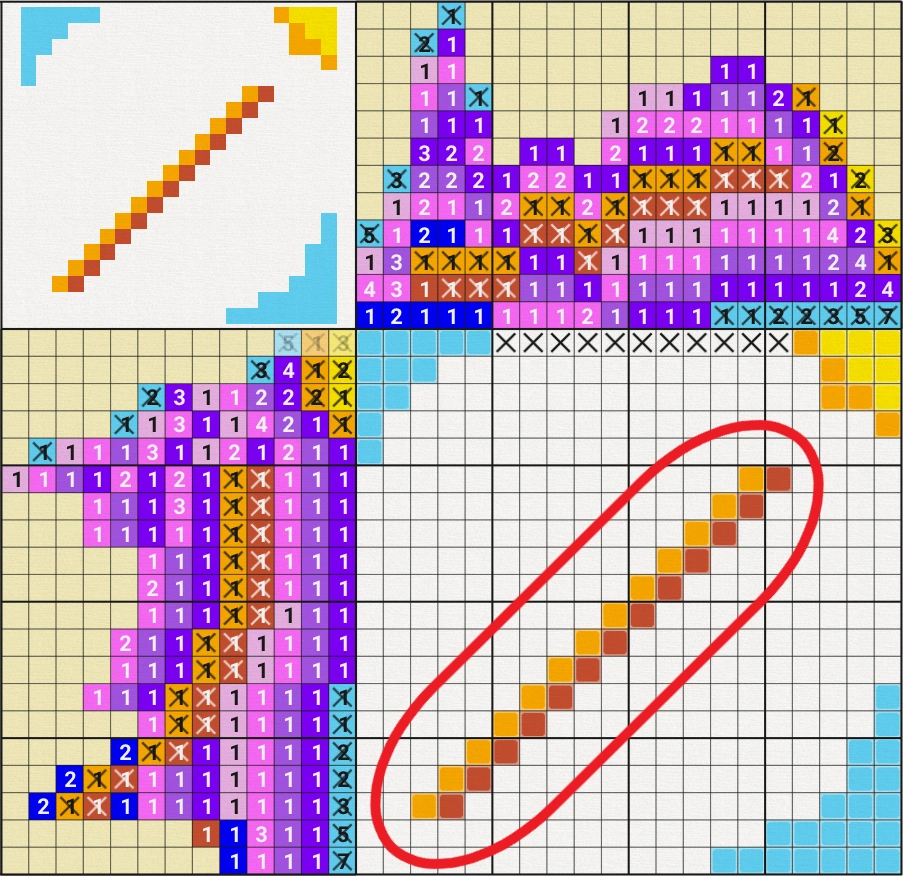
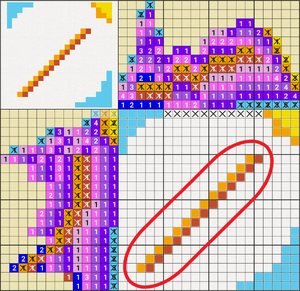
Noticing patterns
When you solve a lot of nonograms you start noticing patterns. Most of the time they mean what you think they do, but be careful, not always. Example 1a (edge pattern): if you notice large numbers in number bars on the edges which get smaller to the middle, that usually means that the edge is color. Example 2a (diagonal pattern): if you notice a bunch one's or two's, that usually means diagonal pattern (check if the pattern goes this way "/" or that way "\").
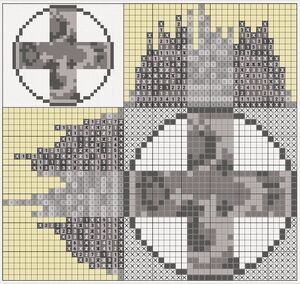
Symmetry
Some nonograms contain symmetrical patterns. Those nonograms which contain over 95% are marked with ![]() (double triangle icon). Some nonograms which are symmetrical, but involve guess work are marked with only
(double triangle icon). Some nonograms which are symmetrical, but involve guess work are marked with only ![]() (yellow dot icon). You will notice these nonograms right away. Symmetrical nonograms are fairly easy to solve, once you recognize them. Some nonograms are only symmetrical in one area (e.g. the bottom half of a vertically symmetrical nonogram).
(yellow dot icon). You will notice these nonograms right away. Symmetrical nonograms are fairly easy to solve, once you recognize them. Some nonograms are only symmetrical in one area (e.g. the bottom half of a vertically symmetrical nonogram).

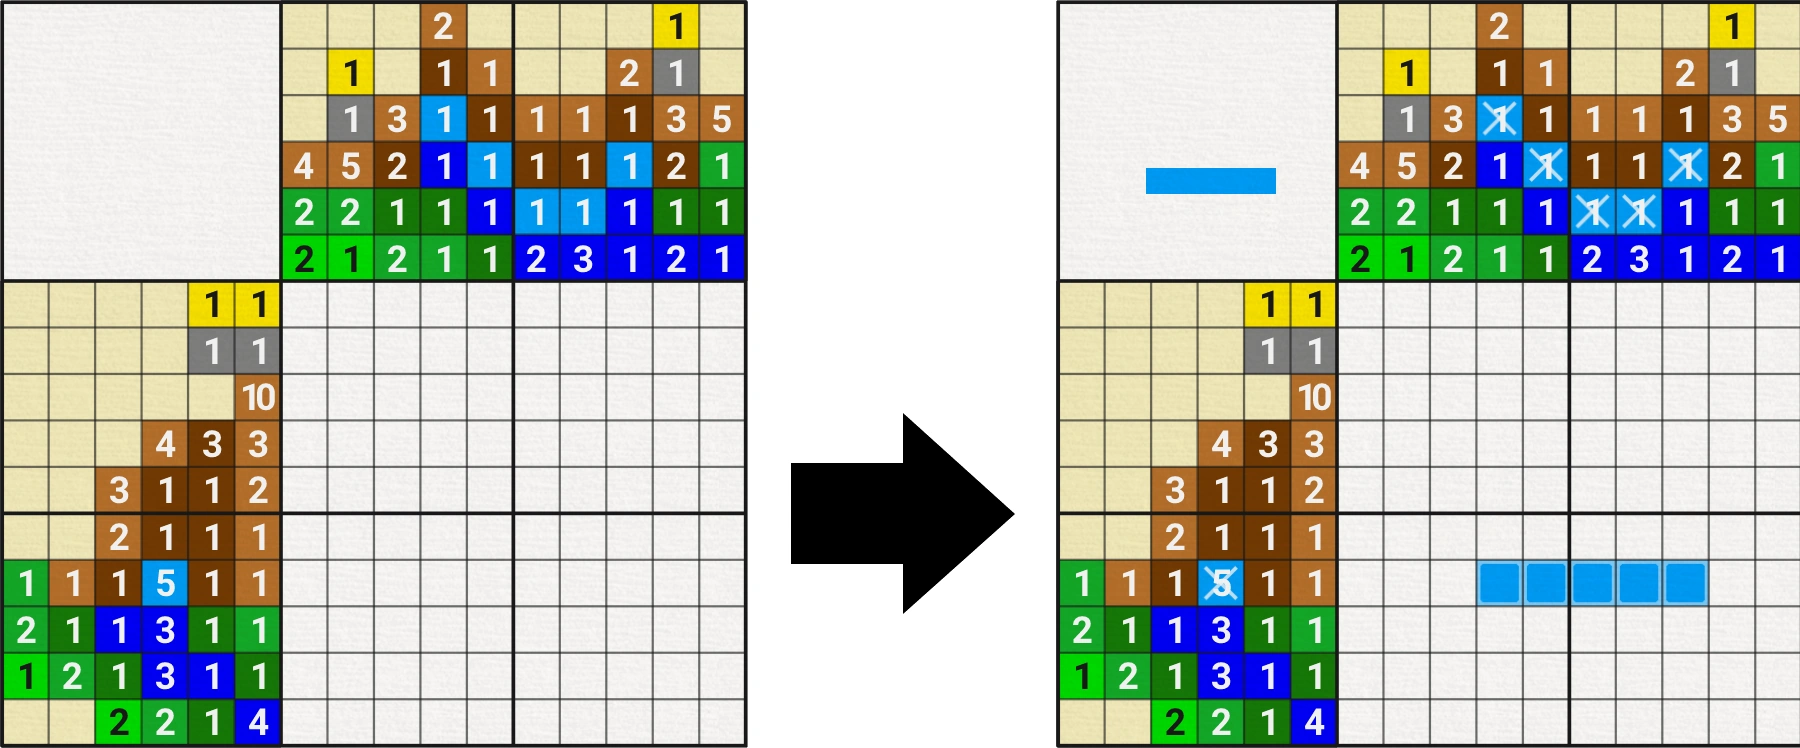
Example: If we split the nonogram (image below) in the middle (vertically), we have the same clues on the right and the left side - just mirrored. We can safely assume that the nonogram is symmetrical (vertically). If we use some logic, we can fill the middle of the nonogram - so it's symmetrical. We can also "split" the clues on the left into two - one for the left and one for the right side. A symmetrical nonogram only requires "actual" solving for one side - the other side can be logically "copied".
Faster coloring
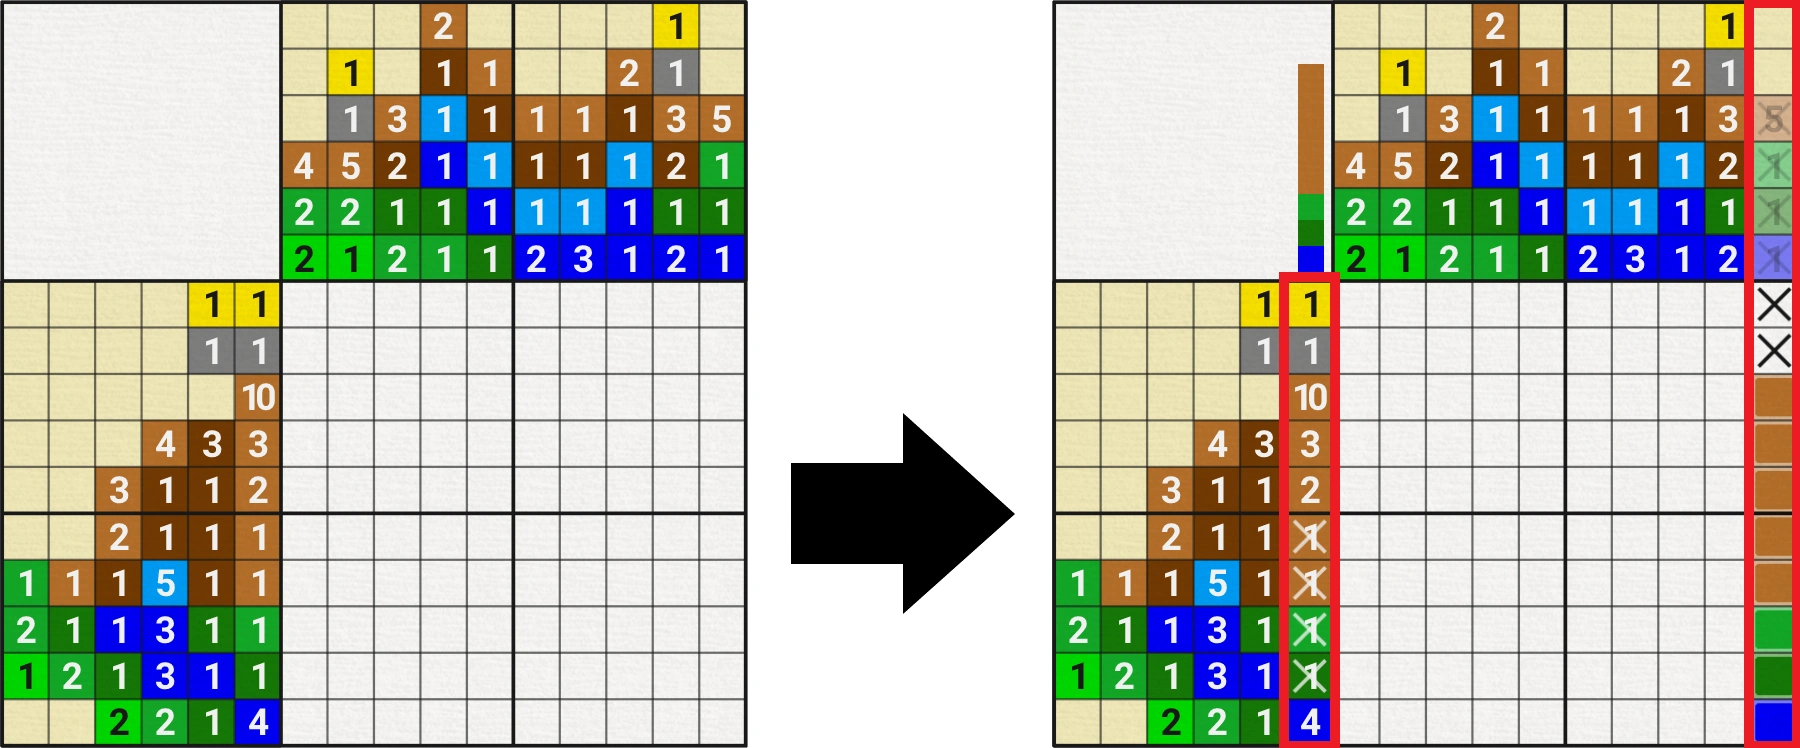
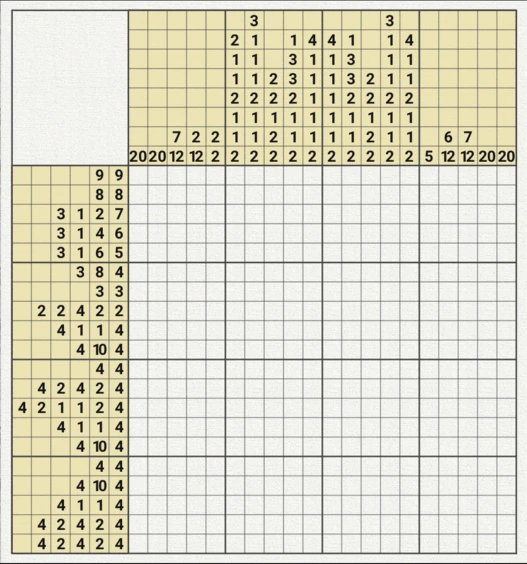
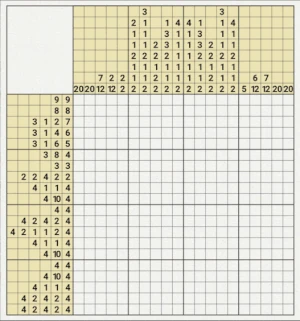
You can go to Zen menu > "Fill All Trivial Lines (Coloring)" to fill all trivial lines at the start or at whatever point of solving. You can also first color all the cells around (color the outline) and then use this feature to fully solve the nonogram (example below). This feature can be used as many times as possible (when there are no trivial lines, this button will be faded). This is very useful for quickly solving easy nonograms - for quickly completing achievements or expeditions. Do note that coloring reduces loot at the end of a solved nonogram.
Example of drawing an outline and then tapping "Fill All Trivial Lines (Coloring)" to fully solve the nonogram.
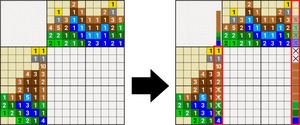
If the player doesn't want to lose loot, they can fill the first column and row with crosses and the assist tool will highlight trivial lines (requires "Highlight errors" enabled). Trivial lines can then be marked with dots (or other marks), crosses deleted and trivial lines manually filled.
Weapons[]
Weapons don't decrease rewards and can speed up solving quite a lot.
- Use Boomerangs to check, if everything is correct. Guessing a cell and then using a Boomerang can save a Shuriken.
- Use Katana(s) at borders. This will help start the nonogram and usually that's all what is needed to make a nonogram from hard to easy.
- Use Mortars or Drums to fully solve a nonogram. They can be combined with Battering ram, Anchor or Steamobile. The percentages are shown in the sack menu.
Solving big nonograms (UI wise)[]
Same rules and tips described above apply to big nonograms, but sometimes solving them on a small screen can be challenging. You can get a bigger screen (tablet), an emulator (see Tips for Adventurers Guild > Adventurers Guild on computer) or you can use the in-game UI and assists. Below are listed steps to follow for easier solving of big nonograms:
- Zoom in the nonogram just enough that you can easily tap a cell without accidentally tapping the neighbouring cell.
- Unlock both number bars. When you zoom in, 2 icons (triangle in a bookmark) appear on the top left corner.
- Adjust number bars. You will probably need to adjust the number bars after they are unlocked. You can bring the number bars farther or closer the nonogram grid by sliding the yellow overlay on the number bars. You can increase or decrease the size of the numbers on the number bars by sliding the blue overlay on the number bars. You usually want to adjust them so that the number bars don't take too much of the screen (50% number bar and 50% nonogram grid) and so that you can easily see the numbers on the number bars.
Some recommended assists:
- Automatically cross out numbers - this is very useful on big nonograms, because it's hard to keep track, which numbers you have already solved.
- Highlights errors - this can be very useful, mostly to prevent accidental taps.
For easier solving the player can also use a stylus. A built-in stylus can be found in User interface > Options, by pressing the cursor icon. The player can also use a physical stylus. It's recommended to use a stylus with a small tip that slides easily.
")
")
")
")
